"🥨 THE BRETZEL STRETCH - Yes that’s a BRETZEL with a B. This is hands down my favorite post training/cool down stretch I like to perform. - You may find it challenging to grab the back foot, if that’s the case then use a band or strap to loop around your foot. - Make sure to keep your hips stacked to protect your low back. - ✅ MAKE IT BETTER by relaxing into rotation using your exhale. - Thanks to @wakethewolves for this awesome T Shirt! 🙌🏽
After an injury or surgery, an exercise conditioning program will help you return to daily activities and enjoy a more active, healthy lifestyle. Following a well-structured conditioning program will also help you return to sports and other recreational activities.
This is a general conditioning program that provides a wide range of exercises. To ensure that the program is safe and effective for you, it should be performed under your doctor's supervision. Talk to your doctor or physical therapist about which exercises will best help you meet your rehabilitation goals.
Strength: Strengthening the muscles that support your lower leg, foot, and ankle will help keep your ankle joint stable. Keeping these muscles strong can relieve foot and ankle pain and prevent further injury.
Flexibility: Stretching the muscles that you strengthen is important for restoring range of motion and preventing injury. Gently stretching after strengthening exercises can help reduce muscle soreness and keep your muscles long and flexible.
Target Muscles: The muscle groups of the lower leg are targeted in this conditioning program, as well as the tendons and ligaments that control movement in your feet. These include: Gastrocnemius-soleus complex (calf) Anterior tibialis (shin) Posterior tibialis (center of calf) Peroneus longus (outside of lower calf) Peroneus brevis (outside of lower calf) Soleus (calf) Dorsiflexors (ankle) Plantar flexors (ankle) Invertors (ankle) Evertors (ankle)
Length of program: This foot and ankle conditioning program should be continued for 4 to 6 weeks, unless otherwise specified by your doctor or physical therapist. After your recovery, these exercises can be continued as a maintenance program for lifelong protection and health of your feet and lower legs. Performing the exercises three to five days a week will maintain strength and range of motion in your foot and ankle.
Getting Started
Warm up: Before doing the following exercises, warm up with 5 to 10 minutes of low impact activity, like walking or riding a stationary bicycle.
Stretch: After the warm-up, do the stretching exercises shown on Page 1 before moving on to the strengthening exercises. When you have completed the strengthening exercises, repeat the stretching exercises to end the program.
Do not ignore pain: You should not feel pain during an exercise. Talk to your doctor or physical therapist if you have any pain while exercising.
Ask questions: If you are not sure how to do an exercise, or how often to do it, contact your doctor or physical therapist.
1. Heel Cord Stretch
Repetitions 2 sets of 10 Days per week 6 to 7
Main muscles worked: Gastrocnemius-soleus complex You should feel this stretch in your calf and into your heel
Equipment needed: None
Step-by-step directions Stand facing a wall with your unaffected leg forward with a slight bend at the knee. Your affected leg is straight and behind you, with the heel flat and the toes pointed in slightly. Keep both heels flat on the floor and press your hips forward toward the wall. Hold this stretch for 30 seconds and then relax for 30 seconds. Repeat.
Tip Do not arch your back.
2. Heel Cord Stretch with Bent Knee
Repetitions 2 sets of 10 Days per week 6 to 7
Main muscles worked: Soleus You should feel this stretch in your calf, the sides of your ankle, and into your heel
Equipment needed: None
Step-by-step directions Stand facing a wall with your unaffected leg forward with a slight bend at the knee. Your affected leg is behind you, with the knee bent and the toes pointed in slightly. Keep both heels flat on the floor and press your hips forward toward the wall. Hold the stretch for 30 seconds and then relax for 30 seconds. Repeat.
Tip Keep your hips centered over both feet.
3. Golf Ball Roll
Repetitions 1 Days per week Daily
Main muscles worked: Plantar fascia ligament You should feel this exercise along the bottom of your foot
Equipment needed: Golf ball
Step-by-step directions Sit on a stable chair with both feet planted on the floor. Roll a golf ball under the arch of your affected foot for 2 minutes.
Tip Sit up tall and keep your foot toward your chair.
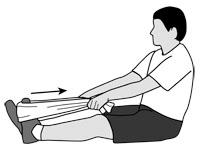
4. Towel Stretch
Repetitions 2 sets of 10 Days per week 6 to 7
Main muscles worked: Gastrocnemius-soleus complex You should feel this stretch in your calf and into your heel
Equipment needed: Hand towel
Step-by-step directions Sit on the floor with both legs out in front of you. Loop a towel around the ball of your affected foot and grasp the ends of the towel in your hands. Keep your affected leg straight and pull the towel toward you. Hold for 30 seconds and then relax for 30 seconds. Repeat 3 times.
Tip Sit up tall and keep your legs straight.
5. Calf Raises
Repetitions 2 sets of 10 Days per week 6 to 7
Main muscles worked: Gastrocnemius-soleus complex You should feel this exercise in your calf
Equipment needed: Chair for support
Step-by-step directions Stand with your weight evenly distributed over both feet. Hold onto the back of a chair or a wall for balance. Lift your unaffected foot off of the floor so that all of your weight is placed on your affected foot. Raise the heel of your affected foot as high as you can, then lower. Repeat 10 times.
Tip Do not bend the knee of your working leg.
6. Ankle Range of Motion
Repetitions 2 sets Days per week Daily
Main muscles worked: Dorsiflexors, plantar flexors, invertors, evertors You should feel this exercise at the top of your foot and throughout your ankle
Equipment needed: None
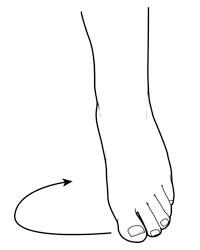
Step-by-step directions Sit down so that your feet do not touch the floor. Use your foot to write each letter of the alphabet in the air. Lead with your big toe.
Tip Keep the movements small, using just your foot and ankle. 7. Marble Pickup
Repetitions 20 Days per week Daily
Main muscles worked: Plantar flexors You should feel this exercise at the top of your foot and toes
Equipment needed: 20 marbles
Step-by-step directions Sit with both feet flat and place 20 marbles on the floor in front of you. Use your toes to pick up one marble at a time and place into a bowl. Repeat until you have picked up all the marbles.
Tip Do not place the marbles too far out in front or to the side.
8. Towel Curls
Repetitions 5 Days per week Daily
Main muscles worked: Plantar flexors You should feel this exercise at the top of your foot and your toes
Equipment needed: Hand towel
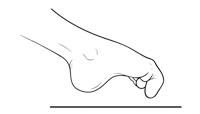
Step-by-step directions Sit with both feet flat and place a small towel on the floor in front of you. Grab the center of the towel with your toes and curl the towel toward you. Relax and repeat.
Tip You can make this exercise more challenging by placing a weight on the edge of the towel.
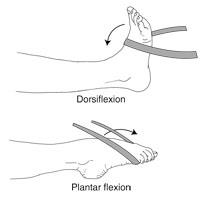
9. Ankle Dorsiflexion/Plantar Flexion
Repetitions 3 sets of 10 Days per week 3
Main muscles worked: Anterior tibialis, gastrocnemius-soleus complex You should feel this exercise at your calf, shin, the back of your heel, and the top of your foot
Equipment needed: Use an elastic stretch band of comfortable resistance
Step-by-step directions Sit on the floor with your legs straight out in front of you. For dorsiflexion, anchor the elastic band on a chair or table leg, then wrap it around your foot. Pull your toes toward you and slowly return to the start position. Repeat 10 times. For plantar flexion, wrap the elastic band around your foot and hold the ends in your hand. Gently point your toes and slowly return to the start position. Repeat 10 times.
Tip Keep your leg straight and heel on the floor for support.
You stand up. Your knee cracks. You walk downstairs. Your knee pops. What's up with all that noise?
"Often it's just the fluid that coats your joints being pushed through certain ranges of motion—and is totally benign," explains Benjamin Butts, director of rehabilitation services and performance therapy at Providence Saint John's Health Center in Santa Monica. But other times that constant cracking, coupled with consistent pain, can be a red flag that something is wrong.
So what's the cause? Generally, tight or misaligned muscles will pull the knee cap out of alignment, explains David Reavy, director of React Physical Therapy in Chicago. Over time that imbalance can cause clicking or popping, which could be a potential problem, says Butts, "because the cartilage can become worn down and potentially lead to early onset arthritis, as well as many issues involved with deterioration of the joint."
To alleviate the awkward noises and keep potential injuries at bay, try these exercises 3 times a week for maximum results.
Calf Release
PHOTOGRAPH COURTESY OF EUN JUNG DECKER/REACT PHYSICAL THERAPY All exercise photos courtesy of Eun Jung Decker at React Physical Therapy.
Why: Self myofascial release is a technique that helps relieve muscle tension and tightness through direct pressure. Stretching, by contrast, simply elongates the muscle. "Releasing allows you to activate tight muscles that are shifting the balance of your muscle structure," says Reavy. Use this technique to release tight calf muscles and get your knee cap back on track. How: Sit with your calf on top of a tennis ball. Stack your other leg on top of it, and roll yourself up and down over the ball. Once you find a spot that's tender, stop and point your foot up and down for 30 seconds. Repeat as needed.
Hip Flexor Release
PHOTOGRAPH COURTESY OF EUN JUNG DECKER/REACT PHYSICAL THERAPY
Why: "Knee pain is often caused by a misaligned hip," says Reavy, who recommends a hip flexor release to combat this. How: Tape two tennis balls together (since your hip flexor is a large muscle, you'll need something a little bigger). Lie on your stomach and place the taped balls just below your hip bone. Lean a tolerable amount of weight onto the balls. Bend the knee on the side of the release to a 90-degree angle and swing your leg side from to side as far as you can tolerate. Repeat as needed in 30-second- to 2-minute intervals.
IT Band Release
PHOTOGRAPH COURTESY OF EUN JUNG DECKER/REACT PHYSICAL THERAPY Why: The Illiotibial (IT) Band is a ligament that runs down the outer edge of the thigh from hip to shin. It's attached to the knee and helps stabilize and move the joint, which is why, when it's tight or inflamed, it can pull the knee cap out of alignment, says Reavy. How: Lie on the side you want to release and place a foam roller under your bottom leg, halfway between your hip and knee. Slide your leg up and down over the foam roller, moving it from the top of the knee to the base of the hip. Try to work over the more tender areas as much as you can tolerate. Repeat in 30-second intervals for 2 minutes. To focus on a specific area of the IT band, locate the most tender area with the foam roller and stop. Bend your knee at a 90-degree angle then straighten. Repeat the motion of bending and straightening for 10 to 15 seconds. Repeat on other tender areas of the IT band.
Side Steps with Resistance Band
Why: The outer quad muscle tends to be weaker than the muscle that runs along the top of your thigh, which leads to the kind of imbalance that causes your knee cap to pull out of line. The solution? Strengthen that outer muscle, says Butts. How: Pull a medium resistance band up right below your knees (not shown) and lower down into a squat (if this is uncomfortable, standing works, too), and move two steps to the right then two steps to the left, working hard to pull your legs apart and stretch the band. Repeat one 30-second to 1-minute set 3 times, 3 days a week.
Inner Thighs Squat
PHOTOGRAPH COURTESY OF EUN JUNG DECKER/REACT PHYSICAL THERAPY Why: Like the outer thigh, the inner thigh is also often weaker than the top part of the quad muscle. To strengthen it—and keep knee pain at bay—Reavy recommends inner thighs squats. How: Place your feet shoulder-width apart with your toes pointed out at a 45-degree angle, keeping the weight on your heels. As you begin to squat, bring your hips back as if you're trying to sit in a chair that's too far behind you. While squatting, move your knees out to the sides and go as low as you can—though no lower than a 90-degree angle—and push back up through your heels. Do 3 sets of 15, 3 days a week.
Vastus Medialis Oblique (VMO) Activation
PHOTOGRAPH COURTESY OF EUN JUNG DECKER/REACT PHYSICAL THERAPY Why: Your VMO, aka the tear-drop shaped quad muscle that runs along the inside of the knee cap, is often one of the weaker muscles on the thigh, says Reavy. Again, that can pull your knee cap off track. The solution? You guessed it: Strengthen it. How: Stand in a split stance, keeping all of your weight in your front leg. Squat straight down, stopping halfway. Your front knee should stay directly over your ankle. While squatting, twist your front leg to the right, hold for 3 to 5 seconds. Release and rise up, pushing through the balls of your feet. Do 3 sets of 15 on each leg, 3 days a week.
You can begin stretching your groin muscles right away. Stretch gently and avoid any pain. If you have pain while doing these exercises, you should not do them.
Hip abductor stretch: Lie on your back. Bend your knees and put your feet flat on the floor. Gently spread your knees apart, stretching the muscles on the inside of your thighs. Hold the stretch for 15 to 30 seconds. Repeat 3 times.
Hamstring stretch on wall: Lie on your back with your buttocks close to a doorway. Stretch your uninjured leg straight out in front of you on the floor through the doorway. Raise your injured leg and rest it against the wall next to the door frame. Keep your leg as straight as possible. You should feel a stretch in the back of your thigh. Hold this position for 15 to 30 seconds. Repeat 3 times.
You may do the next 2 exercises when the pain in the groin muscles decreases.
Side-lying leg lift, cross over: Lie on your injured side with your top leg bent and your foot placed in front of the bottom leg. Keep your bottom leg straight. Raise your injured leg as far as you can comfortably and hold it for 5 seconds. Keep your hips still while you lift your leg. Hold this position for 5 seconds and then slowly lower your leg. Do 2 sets of 15. Straight leg raise: Lie on your back with your legs straight out in front of you. Bend the knee on your uninjured side and place the foot flat on the floor. Tighten the thigh muscle on your injured side and lift your leg about 8 inches off the floor. Keep your leg straight and your thigh muscle tight. Slowly lower your leg back down to the floor. Do 2 sets of 15.
Once it is easy to do the leg lifts, start strengthening your thigh muscles and groin muscles with the following elastic tubing exercises.
Resisted hip flexion: Stand facing away from a door. Tie a loop in one end of a piece of elastic tubing and put it around the ankle on your injured side. Tie a knot in the other end of the tubing and shut the knot in the door near the floor. Tighten the front of your thigh muscle and bring the leg with the tubing forward, keeping your leg straight. Return to the starting position. Do 2 sets of 15.
Side plank: Lie on your side with your legs, hips, and shoulders in a straight line. Prop yourself up onto your forearm with your elbow directly under your shoulder. Lift your hips off the floor and balance on your forearm and the outside of your foot. Try to hold this position for 15 seconds and then slowly lower your hip to the ground. Switch sides and repeat. Work up to holding for 1 minute. This exercise can be made easier by starting with your knees and hips flexed toward your chest. Resisted hip abduction: Stand sideways near a door with your injured side further from the door. Tie elastic tubing around the ankle on your injured side. Knot the other end of the tubing and close the knot in the door near the floor. Pull the tubing out to the side, keeping your leg straight. Return to the starting position. Do 2 sets of 15. For more resistance, move farther away from the door. Resisted hip abduction:Stand sideways next to a door with your injured side closer to the door. Tie a loop in one end of the tubing and slip the loop around the ankle on your injured side. Make a knot in the other end of the tubing and close the knot in the door near the floor. Bring the leg with the tubing across your body sideways, crossing over your other leg and stretching the tubing. Return to the starting position. Do 2 sets of 15.
With soaring cliffs, cascading waterfalls, crystal clear pools and majestic old trees through which the sun dapples, Upper Tonquani is considered by many as the most beautiful and spectacular of all Magaliesberg kloofs.
Karien Bezuidenhout and Marzelle van der Merwe, both competitive female trail runners, decided to spend a weekend exploring this magical place. Seeing that the Tonquani complex stretches for kilometre after kilometre, going light and fast was their only option.
If you would like to visit Tonquani, contact the Mountain Club of South Africa (MCSA) Johannesburg section for more info.
Special thanks to AvantCom for sponsoring the Wenpod MD2 gimbal for the duration of the trip.
For your convenience, we are now also situated in
Queenswood, Pretoria! Offering the best services to help you reach your
physical goals
⚡️🏋️🏌️♀️🤸♀️🤽♂️🚴♀️🏊🥇
☎️
012 0040618
To find out more information, or to book a time to get started with your physiotherapy, call us now at 012 484 1711 (HPC) or on 012 004 0618 (Queenswood) for an expert plan, treatment, and support system. At Sport Physio, we are committed to delivering the best and most tailored designed physiotherapy solution to ensure the highest quality of life possible. We look forward to helping you and your family.
To find out more information, or to book a time to get started with your physiotherapy, call us now at 012 484 1711 (HPC) or on 012 004 0618 (Queenswood) for an expert plan, treatment, and support system. At Sport Physio, we are committed to delivering the best and most tailored designed physiotherapy solution to ensure the highest quality of life possible. We look forward to helping you and your family.
To find out more information, or to book a time to get started with your physiotherapy, call us now at 012 484 1711 (HPC) or on 012 004 0618 (Queenswood) for an expert plan, treatment, and support system. At Sport Physio, we are committed to delivering the best and most tailored designed physiotherapy solution to ensure the highest quality of life possible. We look forward to helping you and your family.
To find out more information, or to book a time to get started with your physiotherapy, call us now at 012 484 1711 (HPC) or on 012 004 0618 (Queenswood) for an expert plan, treatment, and support system. At Sport Physio, we are committed to delivering the best and most tailored designed physiotherapy solution to ensure the highest quality of life possible. We look forward to helping you and your family.
Women's scull (W1x) - Kirsten McCann Men's Pair (M2-) - Jake Green & Lawrence Brittain Lightweight women's scull (LW1x) - Nicole van Wyk and Kirsten McCann Leightweight men's double (LM2x) - Nicholas Oberholzer and Vaughn Botes
How can we help you?
To find out more information, or to book a time to get started with
your physiotherapy, call us now at 012 484 1711 (HPC) or on 012 004 0618
(Queenswood) for an expert plan, treatment, and support system. At
Sport Physio, we are committed to delivering the best and most tailored
designed physiotherapy solution to ensure the highest quality of life
possible. We look forward to helping you and your family.
To find out more information, or to book a time to get started with
your physiotherapy, call us now at 012 484 1711 (HPC) or on 012 004 0618
(Queenswood) for an expert plan, treatment, and support system. At
Sport Physio, we are committed to delivering the best and most tailored
designed physiotherapy solution to ensure the highest quality of life
possible. We look forward to helping you and your family.
The Comrades champion, Charné Bosman (Nedbank Running Club), had just reason to smile after winning the Irene 48km ultra-race.
A year ago after she had finished the same race she was in despair as her foot was quite swollen and sore. Unbeknownst to her she had broken a toe and it was debatable whether she would recover in time to race the Comrades. Luckily she did and the rest is they say history.
Bosman who trains at the High Performance Centre did not really expect to win on Sunday. The Irene Ultra-race was just another good hard training run in which her focus was to emulate to perfection the way she planned to race Comrades.
“I did not taper down at all for the race. I started off with tired legs which were good as the second half of Comrades is usually a battle of mind over body. The temperature soared midway through the race which sapped once energy but again it did not bother me as it can get quite hot during the Comrades. It is important to get used to racing in such heat.”
Bosman won in 3:26:04. She has no plans to race again before Comrades. As last year she will do her final preparation for the “big day” at Graskop.
Suné Liebenberg (13) excels at the African Junior Champions in Egypt 🥇Gold in 200 freestyle 🥇Gold in 200 breaststroke 🥈Silver in 100 breaststroke 🥈Silver in 100 freestyle 🥉Bronze in 50 breaststroke 🏆Trophy for the best in Performance Junior Girl ⭐️ Congratulations on your victorious achievements! Well done! You make us proud!🙌🏽
How can we help you?
To find out more information, or to book a time to get started with
your physiotherapy, call us now at 012 484 1711 (HPC) or on 012 004 0618
(Queenswood) for an expert plan, treatment, and support system. At
Sport Physio, we are committed to delivering the best and most tailored
designed physiotherapy solution to ensure the highest quality of life
possible. We look forward to helping you and your family.
Sport Physio offers the highest quality physiotherapy and services in Pretoria. Professional, motivated & highly skilled physiotherapists will help you to be the best that you can be!






Find Us On: